Wednesday, August 17, 2016

Tea Light Candle Letter Holders

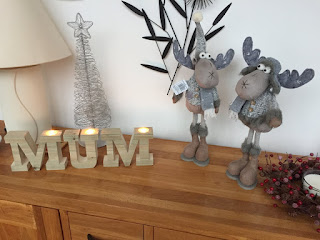
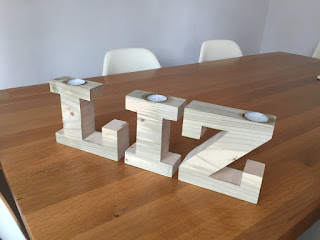
I made these for my girlfriend as a little table decoration for her birthday.  They have proven to be a big hit and I instantly received orders from each of hers and my family members!


They are made from 150 x 50mm floor joists and hold a regular tea light.

First I used Microsoft Publisher to print out 150mm tall letters.  The font I chose was Rockwell as most letters have a chunky top to contain the tealight.  Some letters (like J) had to be modified slightly to stand up on their own, but most were good as they were.  I then cut them out and traced round them with a pencil onto the wooden joist.


Next I cut the letters out using a jigsaw.  I tried using a scroll saw, but the one I had wasn't powerful enough to cut through 50mm.  The one problem with the jigsaw though was that the blade tended to wander, but if I was careful I could compensate for it.


Once I'd cut as much as possible using the jigsaw, I used a selection of files and wood rasps to smooth the rough edges out that couldn't be reached with a sander.  Once that was done, I used a belt sander https://www.machinemart.co.uk/p/clarke-cs4-6d-belt-and-disc-sander to smooth the remaining edges and the front and back of the letters.


Next I used a hole saw https://www.amazon.co.uk/Wolfcraft-Holesaw-Blades-Pilot-Drill/dp/B0001P195Y to cut out the holes for the tealights.  I used a chisel to remove the centres of the holes and then a sanding drum http://www.screwfix.com/p/rubber-drum-sanding-kit-25pcs/19906? to increase the size slightly (there wasn't a perfectly sized hole saw).


Here are some more during and after production shots:


Hope I've given some inspiration.  Thanks for reading!

Tuesday, August 16, 2016

Under Stairs Storage

I did this a number of years ago and I've been meaning to put it online for a while.  It's my solution for the original dark, damp cupboard that existed under the stairs.  It had a single door at the tall end and extended to the very bottom of the stairs.  If I wanted to get anything out from the very end of the cupboard, it was a real mission!


I first ripped out the old MDF cupboard and cleaned out the inside.  The outside wall was bare brick and draughty, so I insulated it with Rockwool and boarded the whole of the inside with plywood.  I then painted the inside white to keep it clean and bright.

I made the fronts of the cupboards/drawers from plywood and 20 x 70mm softwood for the edges.  The tops had to be angled to fit under the stairs and I made them to include a small gap all around, but particularly at the floor level, so they could open without jamming.  I routed a rebate in the back of the softwood, to create a fairly neat joint between the plywood and softwood.

I hung the cupboard door and added an IKEA cupboard handle.

I made the frame for the shoe holder out of 20 x 70mm softwood, which in hindsight was a bit excessive.  I probably could have used smaller section softwood as the whole thing is pretty heavy and there could have been more room for shoes with a smaller and lighter frame!  I would also recommend measuring the width required for 2 pairs of shoes back to back.  I forgot and they overlap!

I wanted to leave the fronts unpainted with no screws showing, so everything is screwed into the fronts from behind.  The castors are fixed 50mm rubber ones from Machine Mart: https://www.machinemart.co.uk/p/ml140r-50mm-fixed-castor-rubber/  I can't recommend enough, using rubber wheels.  I originally used some small nylon castors and they started to ware grooves in the floor!  Once I replaced them with rubber, the problem was fixed.

The smaller drawer was made from 8mm MDF and 20 x 70mm softwood for the frame.


Next I added some wooden runners to the floor and from the floor to the staircase for the drawers to slide between


Next was some lighting and a door switch: https://www.amazon.co.uk/gp/product/B00353D2EU/ and https://www.amazon.co.uk/gp/product/B00403YI3I/


I'm really pleased with the setup and it's a far better solution for storing and easily accessing stuff.

Hope this post was useful to anyone thinking of doing the same!